Waterproofing protects buildings from water damage. It stops leaks, dampness, cracks, and mould. Many people think waterproofing must be done only before or during construction. But the real question is: Can waterproofing be done after construction? The short answer is yes, it can be done. In fact, doing it right after construction or even much later is common and often necessary.
This detailed article explains everything you need to know about waterproofing after construction. It uses simple English and short sentences to improve readability. It is designed for homeowners, engineers, contractors, students, and anyone involved in building work in India.
You will learn what waterproofing is, why it is needed after construction, when it works, methods and materials, cost and planning, common problems, step-by-step processes, tables to compare systems, FAQs, and a complete conclusion. SEO-friendly keywords are integrated naturally, such as post-construction waterproofing, external waterproofing, internal damp proofing, roof waterproofing after construction, basement waterproofing retrofit, balcony waterproofing repair, and wall dampness solution India.
What Is Waterproofing?

Waterproofing is the process of making a part of a building resistant to water penetration. It protects surfaces from rainwater, ground moisture, seepage, seepage pressure, and leakage.
When waterproofing is done properly, water stays out. This prevents rot, rust, cracks, stains, fungus and mould growth on walls and floors.
There are two main classes of waterproofing:
- External waterproofing that keeps water out before it enters the structure.
- Internal waterproofing that deals with water that has already entered or seeped through.
Most people prefer waterproofing early in construction. This gives the best performance. But waterproofing after construction is very common in India. Buildings seldom get perfect waterproofing during initial construction. Many structures show water leaks after a few years.
Why Waterproofing After Construction Is Needed
Waterproofing after construction becomes necessary for many reasons in Indian conditions.
1. Visible Water Leaks
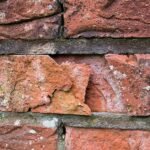
Sometimes leaks appear only after walls and floors are finished. Water shows up as damp patches, efflorescence, or peeling paint.
2. Poor Initial Work
Many builders do not give enough attention to waterproofing during construction. Cheap materials and bad techniques cause early failure.
3. Aging and Wear
Over time, materials lose strength. Roofs, terraces, balconies, and wet areas develop cracks.
4. Change of Use
Adding new structures like bathrooms, planters, or water tanks changes how water flows. Older waterproofing may fail.
5. Heavy Rains and Monsoon
In India, monsoon rains bring heavy water loads. Poor drainage or blocked outlets cause water to sit and penetrate.
6. Rising Damp and Capillary Action
Groundwater can rise in walls over time if damp proofing is missing or damaged.
7. Renovation Work
If you alter interiors or renovate wet areas, water resistance must be restored.
Where Can Waterproofing Be Applied After Construction?
Several areas may need post-construction waterproofing:
- Roofs and terraces
- Balconies and walkways
- Basements and foundation walls
- Retaining walls
- Bathrooms and wet areas
- Kitchen floors where water stagnates
- Planters and planter boxes
- Window openings and parapet walls
- Water tanks and overhead tanks
- Swimming pools and fountains
Each area has different water pressure and exposure conditions. This requires different solutions.
Key Types of Post-Construction Waterproofing

The right waterproofing method depends on where the leak is and how the water reaches the structure. Here are the main techniques:
1. Cementitious Waterproofing
Cement-based coating applied on concrete.
It sticks well to masonry and concrete.
Easy to apply for internal wet areas and balconies.
Benefits:
- Cost effective
- Easy application
- Ideal for small leaks
Limitations: - Not suitable for areas with high hydrostatic pressure
2. Bituminous Coating
Black tar-like layer used on roofs and basement floors.
It keeps water out from rain.
Benefits:
- Good protection against rain
- Easy to apply
Limitations: - Not suitable for exposed finishes without protection
- Can soften in extreme heat
3. Liquid Applied Membranes
Polyurethane or acrylic-based liquids that create a seamless membrane.
Benefits:
- Flexible and durable
- Works well on roof terraces
- Good for irregular shapes
Limitations: - Requires good surface preparation
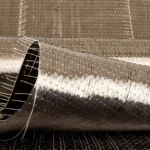
4. Sheet Membranes
PVC, TPO, or bituminous sheets applied with heat or adhesive.
Benefits:
- Continuous, strong barrier
- Ideal for bathrooms and roofs
Limitations: - Requires skilled installation
5. Crystalline Waterproofing
Special chemicals react and form crystals inside concrete pores.
They block water paths from within.
Benefits:
- Works even if minor cracks appear later
- Useful for basements
Limitations: - Takes good curing and application care
6. Injection Grouting
Polymers or cementitious grout are injected into cracks behind plaster.
Benefits:
- Targets specific leak points
- Good for wall and slab leaks
Limitations: - Works only for visible cracks
7. External Protective Plasters
Finishes with protective cement plasters (lime, acrylic, or polymer plaster).
Often used on outer walls.
Benefits:
- Protects plaster and waterproofing beneath
Limitations: - Needs good quality finishing
Also Read Wastewater Reuse in Construction — Complete Guide for Sustainable Building in India
When Is Post-Construction Waterproofing Recommended?
Post-construction waterproofing is appropriate when:
- Leaks appear after finishing
- You see damp marks or efflorescence
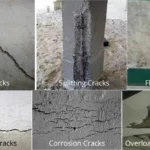
- Cracks develop in plaster or concrete
- Bathrooms, balconies or terraces leak
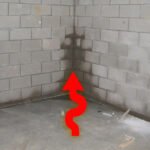
- Basement walls show water seepage
- Root water from planters is damaging structures
- External walls staining or bubbling paint
- Roof puddles and water stagnation occur
If you see these signs, waterproofing should be done promptly to avoid bigger damage.
How to Check Whether Waterproofing Is Needed
Before applying, do a proper assessment:
- Inspect visible cracks and damp patches
- Check water stains after rain
- Look for bubbling or peeling paint
- Test for moisture with simple moisture meter
- Perform water pond test on terrace or balcony
- Check bathroom floor tiling and grout condition
This helps choose the right method and avoids wasted expense.
Step-by-Step Post-Construction Waterproofing Process
Here is a methodical workflow you can follow:
Step 1: Identify the Leak Source
Observe wet spots, stains or water flow patterns.
Use water tests or hire a professional leak detector.
Step 2: Prepare the Surface
Remove loose plaster, paint, dust, and grease.
Open cracks using tools to create a clean base.
Step 3: Repair Cracks and Joints
Use fillers, epoxy or cement grout to seal visible cracks.
This prevents water from entering under the new waterproofing layer.
Step 4: Apply Primer or Bonding Coat
Some systems require a primer for better adhesion.
Follow product guidelines.
Step 5: Apply Waterproofing Layer
Use the chosen system (cementitious, liquid membrane, sheet membrane etc.).
Apply in multiple coats if required.
Step 6: Protect the Waterproofing
For external areas, cover with screed, tiles, pavers, or protective plaster.
Step 7: Cure Properly
Many systems need 24–72 hours of curing time.
Do not allow water contact until fully cured.
Step 8: Test Again
After curing, do a water test.
Check for leaks or seepage.
Post-Construction Waterproofing for Different Areas
Roof and Terrace Waterproofing
Terraces need strong protection because they face heavy rainfall and heat.
Common solutions:
- Liquid applied membranes
- Sheet membrane below tile finish
- Cementitious coating with protective screed
Balcony Waterproofing
Balconies connect to external walls and slabs.
They need edge protection and slope for drainage.
Polyurethane liquid membranes and PVC sheets work well here.
Bathroom and Wet Areas
Bathrooms have water all the time.
Use sheet membrane under tiles and a good grout seal.
Crystalline and liquid coatings add extra protection.
Basement and Subterranean Walls
Basements face soil moisture and hydrostatic pressure.
External waterproofing is best, but internal pressure-resistant membranes are also used.
Drainage systems should also be installed.
Planters and Roof Gardens
Planter boxes have constant moisture and root pressure.
Bituminous coatings, sheet membranes, and drainage layers are used together.
Wall Dampness and Rising Damp
For rising damp, install damp proof courses (DPC) and internal chemical damp proofing.
Remove old plaster and reframe moisture barriers.
Materials and Costs in India
The cost of waterproofing after construction varies by method and area.
| Method | Suitable Areas | Approx Cost* | Durability |
|---|---|---|---|
| Cementitious | Bathrooms, balconies | ₹80 – ₹150/sq.ft | 3–7 yrs |
| Liquid applied membrane | Terrace, balcony | ₹150 – ₹300/sq.ft | 5–10 yrs |
| Sheet membrane | Roof, bathroom floors | ₹200 – ₹400/sq.ft | 7–12 yrs |
| Crystalline | Basement walls | ₹100 – ₹250/sq.ft | 5–10 yrs |
| Injection grouting | Cracks & joints | ₹50 – ₹150/lineal ft | As needed |
N.B. Prices are approximate and vary by city, project size, and material brand.
Proper workmanship is critical for long service life.
Common Mistakes in Post-Construction Waterproofing
Avoid these errors:
- Using cheap materials
- Poor surface preparation
- Not identifying leak source properly
- Skipping primer or adhesion layer
- Ignoring drainage and slope needs
- Applying in wet weather
- Not protecting waterproofing after application
- Overlooking expansion joints
Mistakes cause early failure and cost more in repairs.
Benefits of Waterproofing After Construction
- Stops ongoing leaks and water damage
- Improves durability of structure
- Prevents mould and health risks
- Saves money in long run
- Enhances resale value of property
- Supports aesthetic finishes
- Meets building code and warranty conditions
Challenges and How to Overcome Them
Challenge: Working on occupied buildings
Solution: Do small sections at a time, use temporary covers, and work at low traffic hours.
Challenge: Difficult access to leak spots
Solution: Use inspection cameras, moisture meters, or hire specialists.
Challenge: Matching old finishes
Solution: Use flexible membranes or protective layers then finish with matching tiles or plaster.
Challenge: Weather issues during monsoon
Solution: Use weather-resistant systems and plan work in dry seasons when possible.
Safety and Environmental Considerations
- Wear protective gear (mask, gloves, goggles).
- Ensure good ventilation for liquid membrane works.
- Use environmentally safe products where possible.
- Dispose of waste and old debris properly.
Frequently Asked Questions (FAQs)
Q1. Can waterproofing always be done after construction?
Yes. Waterproofing can be done after construction but success depends on correct method, surface preparation, and quality materials.
Q2. Why do leaks appear even after construction waterproofing?
Poor workmanship, inadequate materials, lack of maintenance, and heavy rains can cause leaks later.
Q3. How long does post-construction waterproofing last?
It depends on method and care. Liquid membranes may last 5–10 years. Sheet membranes may last 10–15 years with protection.
Q4. Can leaking walls be waterproofed from inside only?
Yes. Internal waterproofing systems can work when outside access is difficult, but external waterproofing is more effective.
Q5. Is waterproofing necessary before tiling balconies?
Always. Proper waterproofing prevents water entering slab and walls.
Q6. Can sewer smell indicate waterproofing failure?
Yes. Water leakage can allow sewer smell to enter if drainage or seals are compromised.
Conclusion
Waterproofing after construction is not just possible. It is often necessary. Many buildings develop water problems after finishing due to poor initial work, wear and tear, heavy monsoon, changes in use, or ageing of materials. Waterproofing after construction — if done with proper methods and materials — can stop leaks, protect structural health, prevent mould and increase building life.
Successful post-construction waterproofing starts with correct leak detection, proper surface preparation, choosing the right system, and skilled application. Whether it is roof, terrace, balcony, bathroom, basement or planter, there are appropriate technologies available.
For Indian climates and construction practices, waterproofing after construction supports longevity, safety, comfort and value of buildings. When problems arise, timely action saves money and effort later.
If you want, I can also give you a step-by-step checklist for inspecting leak points, or a DIY planning tool to calculate cost and materials needed for post-construction waterproofing in your building. Just tell me what you need.