A cement concrete road (also called a rigid pavement) is one where the top surface is a slab of concrete. In India, such roads are common for highways, industrial areas, and heavy-traffic zones. They consist of several layers built on the natural ground. As one source explains, “roads having a wearing surface consisting of a cement concrete slab are called cement concrete roads”. The main layers (from bottom to top) are:
- Subgrade: The natural or prepared soil on which the road is built. It must be strong, levelled, and compacted. Any weak or soft spots are removed or stabilized. The subgrade “provides support to the layers above” and should have uniform strength.
- Sub-base (or base): A layer of granular material (such as crushed stone, gravel, or sand) placed above the subgrade if the soil is weak. The sub-base distributes loads, prevents capillary rise of water, and provides a firm platform. For example, a sub-base might be a well-graded gravel mix (up to ~15 cm thick) or layers of water-bound macadam. Its purposes include stopping mud pumping, strengthening the foundation, and allowing a thinner concrete slab.
- Concrete Pavement (Slab): The top riding surface made of Portland cement concrete. This is a mix of cement, coarse aggregate (crushed stone, typically up to 20–40 mm), fine aggregate (sand), and water. Sometimes additives (like plasticizers) or cement replacements (like fly ash) are used. The concrete slab is cast on-site and forms the smooth driving surface. It must be designed for strength and durability; mix design follows IRC specifications (e.g. IRC:44-2017 for mix design).
These components work together: the subgrade and sub-base provide support, while the concrete slab carries the traffic loads. The concrete mix (cement+aggregates+water) should be well-proportioned for strength and workability. In summary, “the structural components of such roads are Subgrade, Sub-base, and Cement Concrete Slab”.
IRC Guidelines: In India, concrete road construction follows IRC (Indian Roads Congress) standards. For example, IRC SP:62 (2014) gives guidelines for design and construction of rural cement concrete pavements, and IRC 15 (2011) is a code of practice for concrete road works. The IRC:44-2017 code provides the standard mix design procedure. Engineers use these codes to choose materials and slab thickness for the expected traffic. (E.g., IRC:SP-62 and IRC:44 ensure the pavement will be durable under Indian conditions.)
Key Materials and Components

A cement concrete road uses the following key materials and parts:
- Cement: Typically Ordinary Portland Cement (OPC), usually Grade 43 or 53. Sulphate-resistant cement may be used in sulphate-rich soils. Cement binds the aggregates.
- Coarse Aggregate: Crushed stone or gravel, clean and hard, up to 20–40 mm size. Must meet IS 383 grading limits. Coarse aggregate provides strength and stability.
- Fine Aggregate: Sand (natural or crushed stone sand) meeting grading zones of IS 383. It fills voids between coarse particles. It should be clean, free of clay or organic matter.
- Water: Clean water, free of impurities. Water-cement ratio is carefully controlled by mix design.
- Admixtures (optional): Chemical admixtures (plasticizers) or mineral admixtures (fly ash, slag) may be used to improve workability or durability.
- Reinforcement/Bars: Typically dowel bars at transverse joints, and tie-bars at longitudinal joints, to transfer load and hold slabs together. (This is called a jointed plain cement concrete pavement when using dowels.)
- Joints Material: Seals or filler for expansion and contraction joints (e.g. bitumen or sealant).
The structural layers in a completed road are: subgrade, sub-base, base course (if used), and the concrete slab. In practice, one often specifies a lean concrete base or base course (a weaker concrete or cement-stabilized layer) between sub-base and slab for extra support.
Advantages and Disadvantages

Cement concrete roads have several advantages over flexible (bituminous) roads, but also some drawbacks:
- Advantages:
- Durability and Long Life: Concrete roads last much longer than asphalt roads. (Typical service life is 20–30 years or more.) As one source notes, “the life span of such roads is more”.
- High Strength: The rigid slab distributes loads over a wide area. These roads handle heavy traffic and loads well.
- Low Maintenance: They need less frequent maintenance and do not rut or flow under heat and heavy loads. Maintenance costs are generally lower.
- Smooth, Dust-Free Surface: The white color and smooth texture give good visibility at night and a clean, dustless ride.
- Weather Resistance: Concrete does not soften in high temperatures or get affected by oil spills. It is almost unaffected by weatheringtestbook.com.
- Precision: Concrete can be placed with high accuracy in shape and slope, which is useful for curves and drainage.
- Disadvantages:
- High Initial Cost: The initial construction cost is higher than for bituminous roads. (Concrete and labor are more expensive.)
- Long Curing Time: After paving, the road needs days to weeks of curing before it can carry traffic. Opening to traffic typically takes 15–20 days (up to 28 days in some cases), whereas an asphalt road can open in 1–2 days.
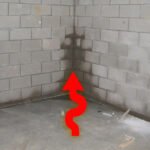
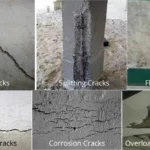
- Cracking Risk: Concrete is prone to shrinkage and temperature cracks if not properly jointed. It must be well cured to avoid warping and cracking.
- Less Resilient: It can be brittle under shock loads and noisy under certain traffic (steel-tired wheels).
- Repair Difficulty: Repairing buried utilities under concrete is difficult because you must cut through the slab.
- Joints Needed: Expansion and contraction joints must be provided frequently to control cracking, which complicates construction.
These trade-offs mean engineers decide between concrete vs bitumen based on traffic load, cost, climate, and available maintenance. The table below compares some key differences:
| Aspect | Flexible (Bituminous) Road | Cement Concrete Road |
|---|---|---|
| Compaction | By rolling of hot mix | By vibration of concrete |
| Curing | Not required | Required (keep slab moist) |
| Formwork | Not needed | Required for edges/joints |
| Initial Cost | Lower | Higher |
| Maintenance Cost | Higher (more frequent repairs) | Lower (less frequent) |
| Opening to Traffic | ~1 day after paving | 15–20 days (typical) |
| Useful Life | Shorter, 10–15 years typically | Longer, 20+ years |
The table shows that cement roads require curing and a wait before use, but then provide a long-lasting surface (open to traffic after ~3 weeks).
IRC Guidelines for Concrete Roads
Indian Roads Congress (IRC) codes give rules and specifications for concrete pavement design and construction. Notable IRC standards include:
- IRC:SP-62-2014 – “Guidelines for Design and Construction of Cement Concrete Pavements for Low Volume Roads.” This covers rural highways and village roads.
- IRC:15-2011 – “Standard Specifications and Code of Practice for Construction of Concrete Roads.” This is the general specification for concrete pavement works.
- IRC:44-2017 – “Guidelines for Cement Concrete Mix Design for Pavements” (Third Revision). It specifies how to proportion cement, aggregates, and water. As one official note says, this document was approved by the IRC for publishing in 2017.
- IRC:SP-76-2024 and SP:140-2024 – Newer guidelines for concrete overlays (whitetopping) and short slab pavements on highways.
- IS Codes – For materials, e.g. IS 456 for concrete, IS 383 for aggregates, IS 2386 for tests.
In practice, engineers refer to these codes to choose concrete grade, slab thickness, joint spacing (typically ~5–6 m for contraction joints), and finishing details. For example, IRC requires transverse joints (with dowels) and often recommends tied concrete shoulders for main lanes to reduce edge stresses.
Also Read What Is the Main Purpose of Using Stirrups During Construction?
Construction Process (Step-by-Step)
Building a cement concrete road involves sequential operations. The main steps are:
- Prepare the Subgrade: Clear vegetation and debris. Excavate or fill the ground to reach the design level and alignment. Compact the subgrade soil to achieve uniform density and strength. Any soft spots should be removed and refilled with suitable material, then compacted. The subgrade surface is checked for the correct slope and grade. If concrete is to be placed directly on the soil, the subgrade is flooded with water for 6–20 hours before paving to prevent it from sucking moisture from the concrete.
- Provide the Sub-base (if needed): If the natural subgrade is weak, a sub-base layer is laid. The sub-base may be a layer of crushed gravel, a layer of brick soling plus water-bound macadam, or lean concrete (up to 10–15 cm thick). Its role is to provide a capillary cut-off (preventing mud pumping), to add strength, and to allow a thinner concrete slab. The choice depends on soil quality, traffic, and economy. After spreading, the sub-base is compacted well.
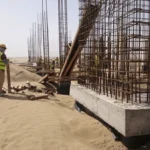
- Place Forms (Side-Forms): Set up side forms (edge molds) along the edges of the road alignment. Forms are typically made of steel channel or treated timber. The depth of the form matches the slab thickness. Braces and stakes hold the form rigidly in place. Check that the forms are straight (within ±3 mm vertically and ±5 mm horizontally over 3 m length). Oil the forms with a release agent so concrete won’t stick. These forms define the edges and contain the concrete.
- Wet the Base Surface: Just before placing concrete, moisten the prepared subgrade or sub-base. After formwork is fixed, sprinkle water on the ground if it is dry. The soil should be saturated about 12 hours before pouring to minimize water loss from concrete. (If a waterproof membrane is used, this step can be skipped.) A uniformly damp surface helps bonding and prevents the concrete mix from drying out too quickly.
- Batching and Mixing: Prepare the concrete mix in proportions determined by design. In a batching plant, weigh the cement, sand, and crushed stone to the correct ratio. Mix them together thoroughly in dry state, then add the calculated amount of water (and any admixtures) to achieve the target water-cement ratio. Mixing can be done in a truck mixer or stationary mixer. The result is a fresh, uniform concrete. For roadworks, batching by weight is preferred for accuracy.
- Transport and Place Concrete: Transport the mixed concrete quickly to the paving site. This can be done using dumpers, wheelbarrows, or concrete carriers. Pour the concrete onto the subgrade/sub-base. It is placed in layers of about 50–80 mm (usually 2–3 times the maximum aggregate size). Place the concrete continuously across the full width of a form bay to form each slab. The top of the freshly placed concrete should be slightly higher (about 10 mm) than the desired level, to allow for compaction and finishing. Spread the mix evenly and ensure it roughly matches the camber (cross-slope) of the road. Work continuously until the bay is full; provide construction joints if work stops (see below).
- Screed and Compact (Floating): Consolidate the concrete to remove air pockets and bring it to final level. First, use a straight-edged screed board or heavy wooden tampers to strike off excess concrete along the forms. The screed moves back and forth, working along the full length of the bay. The screed or hand-tampers (wooden boards about 75 mm wide) press the concrete and shape it to the correct cross-section. Next, perform vibration by surface vibrators or internal immersion vibrators. This ensures full compaction and bond among particles. The concrete layer is now levelled and compacted.
- Finish the Surface: Once compacted, the surface is floated and finished to the required smoothness. First, float the slab longitudinally with a wooden or power float to smooth out any screed marks. This operation also brings cream (mortar) to the surface. Immediately after floating, a textured finish is applied:
- Belting: A metal or wood finishing straightedge (“belt”) is run over the surface to flatten it and remove trowel marks. Sometimes omitted for low-speed roads.
- Brooming: Brushing the surface transversely with a stiff broom gives a non-slip texture. This is done just before the concrete stiffens.
- Edging: Finally, run an edging tool along each side joint to round off the corner and prevent chipping. All these finishing steps create a safe, even driving surface.
- Curing: Proper curing is critical. It prevents the concrete from drying too fast, which would weaken it. Immediately after finishing, begin curing by keeping the slab surface moist. First, initial curing for 24 hours: cover the slab with wet burlap, mats, or plastic. After 24 h (when the concrete can be walked on), remove covers and start final curing for 2–3 weeks. Methods include ponding (flooding shallow water on the slab), covering with 4–8 cm of wet sand or earth, or spraying a curing compound (e.g. calcium chloride or curing membrane). This maintains hydration of the cement. Proper curing greatly improves strength and durability.
- Install Joints: While concrete is still fresh (or in next steps), saw or form the required joints. These include contraction (saw) joints and expansion joints every few meters (often 4–6 m) to control cracking. Dowel bars or tie bars are placed across transverse joints to transfer loads between slabs. After curing, fill the joints with compressible filler and sealant (such as bituminous sealant). According to IRC practice, transverse joints should be sealed to prevent water ingress. Filling joints properly is mentioned as a final step: “the joints are then properly filled-in with a suitable sealing compound” after curing.
- Open to Traffic: The road can carry traffic only after the concrete attains sufficient strength. This usually means waiting at least 7–14 days, but often the contractor waits 28 days. As one source notes, a concrete road is typically opened to traffic “when it attains the required strength or after 28 days of curing”. By contrast, a bituminous road could open in 1 day. Once open, early traffic loads are ideally light to allow continued strength gain.
These steps should be done methodically. For wide roads or multiple lanes, construction may use special methods:
- Alternate Bay Method: Pour one rectangular “bay” (about 6–8 m long for a single lane) and leave the next bay empty. Work advances by skipping alternate sections, which allows traffic to be diverted onto completed portions. This method makes joints easier and provides working platform, but can be slower. In a single-lane road, each bay is around 6–8 m long; in a two-lane road, alternating bays in each lane may be used.
- Continuous Bay (Full-Width) Method: Also called slip-form paving. Concrete is poured continuously across the entire width of the road (or a full lane width) without breaks. In this case, only transverse joints are sawed after curing, and additional dummy (control) joints are placed every 5 m or so to control cracking. (The continuous method is fast, but requires extra jointing and careful work stages.)
- Expansion-Strip Method: Each lane or bay is poured full-width with expansion strips on one edge. This keeps each slab isolated to avoid joint saw-cutting, but is less common now.
In practice, the chosen method depends on traffic management needs. Regardless of method, key quality checks include: layer thickness, concrete mix quality, surface evenness (checking with straightedges), and timely curing.
Conclusion
Cement concrete road construction is a careful, multi-step process. It begins with building a strong foundation (subgrade and sub-base) and ends with curing and opening the slab for traffic. Following IRC guidelines and good field practice ensures the pavement will be durable. The steps above – subgrade preparation, sub-base laying, formwork, mixing and placing concrete, surface finishing, and curing – must all be done correctly. When done well, concrete roads offer high strength, long life, and low maintenance. Such roads resist heavy loads and weather, making them suitable for highways and industrial areas. Proper design (as per IRC) and execution help avoid common issues (cracking, roughness). In sum, cement concrete pavements provide a rigid, reliable driving surface when built with the right materials, joints, and curing. With care in each stage, the result is a smooth, strong road that serves traffic for decades.
Frequently Asked Questions
What is the purpose of a cement concrete road?
A cement concrete road provides a durable, long-lasting pavement. It is built for strength and stiffness, so it can carry heavy and repeated traffic with minimal deformation. Such roads remain smooth and weather-resistant for many years.
What are the advantages of using cement concrete for road construction?
Cement concrete roads last longer and require less maintenance than flexible roads. They offer a strong, smooth surface that does not rut or get damaged by oils and heat. Other advantages include good visibility (white surface) and cleanliness (dustless riding surface). Concrete roads are also less prone to potholes and can support heavy axle loads without quick failure.
What are the key layers (components) of a cement concrete road?
From bottom to top, the main components are the Subgrade (compacted soil base), a Sub-base (optional granular layer for extra support), and the Concrete Pavement (the top slab of cement-aggregate mix). The subgrade is the native ground prepared to be strong and uniform. The sub-base (if needed) is a layer of crushed rock or soil-cement for load distribution. The concrete pavement itself consists of cement, coarse and fine aggregates, and water.
What is the procedure for preparing the subgrade?
The subgrade preparation involves removing topsoil, levelling, and compaction. First the existing soil is cleared of vegetation. Fill or cut operations bring the ground to the design level. Then heavy rollers or tampers compact the soil to increase its bearing capacity. Any wet or weak spots are replaced with better fill. Finally, the surface is checked for evenness and proper slope. In some cases, a layer of gravel or sand is added on top of the subgrade to improve drainage and uniformity.
How is the concrete mix designed for road construction?
The concrete mix design accounts for traffic loads, climate, and required strength. It determines the proportions of cement, water, sand, and aggregates to meet performance criteria. The goal is to achieve a workable mix that will reach the target compressive and flexural strength. As one guide notes, mix design involves “determining the optimal proportions of cement, aggregates (sand and crushed stone), water, and any required admixtures” for the conditions. In practice, engineers use the IRC:44 mix design guidelines to calculate a target strength (usually based on flexural strength) and specify the water-cement ratio accordingly. Trial mixes are then tested to ensure the design strength is met.
How long does a new concrete road take before traffic can use it?
Concrete needs time to harden. Typically, a cement concrete road is opened to traffic 15–28 days after paving, depending on strength gain. Initial curing (keeping it wet) is done for the first 24 hours, after which the slab has some strength. Final curing continues for up to 3 weeks. The surface should not receive heavy loads until it has attained enough strength, which often means waiting about 14–28 days. After that period, the road can carry normal highway traffic.
How are joints provided in cement concrete pavements?
Joints control cracking and allow for expansion. Contraction (saw) joints are cut transversely at regular intervals (often 4–6 m apart) once the concrete has set. Expansion joints (with compressible filler) are placed at structures or edges. Dowel bars are used across contraction joints to transfer wheel loads and keep slab alignment. Tie-bars are used in longitudinal joints (between lanes). After curing, joints are sealed with a flexible sealant to prevent water from seeping in. Proper jointing is critical: for example, in continuous paving, dummy joints are formed every 5 m to control cracks